What is Concentricity & How to Measure Concentricity - All You Need to Know about Concentricity | Dajin Precision
When you manufactured a CNC turning piping part, concentricity is the term for checking whether the tube wall thickness between the OD and ID is constant, which means the part is concentric. Then what is concentricity and how to measure it? Other than these questions, we'll also present the formula for calculating the concentricity, as well as OD/ID concentricity and wall runout.

Related Read: What is Straightness & How to Measure It
What is Concentricity - Concentricity Definition
Concentricity is a special form of coaxiality. There are several forms of explanations for concentricity.
1. When the element to be measured in the center of a circle (point), the axis of a hole or axis on a thin-walled workpiece, the measured axis can be regarded as a point, and their coaxiality to the datum is called concentricity. Simply speaking, it is the coincidence degree of the centers of two circles. There are two kinds of runout tolerances: circular runout and total runout.
2. In some cases, such as the coaxiality of some spherical surface to the center of the ball, can also be called concentricity.
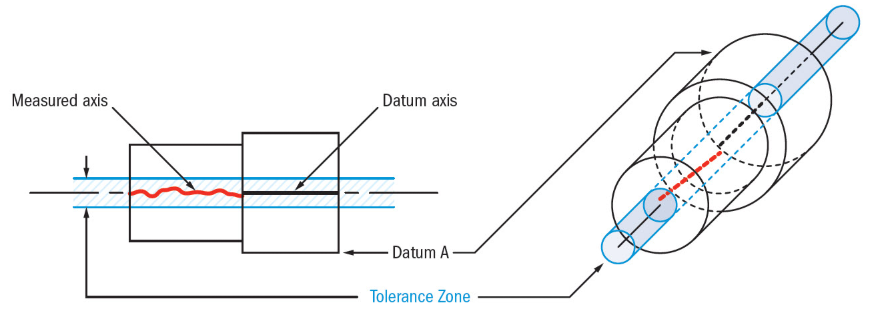
3. Concentricity is the tolerance that controls the central axis of the referenced feature to a datum axis. The axes for the referenced feature and datum are derived from the center point of the part.
4. In geometric dimensioning and tolerancing (GD&T), concentricity is a 3-Dimensional cylindrical tolerance zone for the median points of a cylindrical or spherical part.
How to Measure Concentricity?
Concentricity is considered one of the most difficult GD&T traits to measure, due to the challenges in establishing the theoretical central axis. The measurement of concentricity can be done with a Dial Gauge or CMM (coordinate measuring machine) through the following methods.
Measure concentricity with CMM:
1. Common axis
It is mainly used when the distance between the measuring element and the datum element is too large, and they are both thin-walled.
Principle: make a virtual connection between the measuring element and the datum element, the connected line can be regarded as a common axis, which is used as the datum to measure the center (point) of the circle on both sides.
2. Straightness
It is mainly used in through holes and workpieces with several holes in succession (at least 3 holes).
Principle: measure the circle of each section, and fitting all centers into straight lines. The straightness can reflect the concentricity
3. Maximum inscribed circle
For some long-distance holes, the directions of these holes are different, project the center of each section on the same datum plane, use these centers to fit the maximum inscribed circle to check the deviation of the center.
Measure concentricity with Dial Gauge:
Keep the target in place and put the dial gauge on the top of the circumference for the axis indicating the tolerance. Rotate the target and measure the maximum and minimum runout with a dial indicator. Measure around the specified circumference. The largest maximum and minimum difference is used as concentricity.
How to Calculate Concentricity?
The calculation formula of concentricity is simple, but it's not easy to ensure the survey of the varying thickness of the piping or tubing wall is comprehensive. Finding the thinnest and thickest thickness may need multiple trial and error, you can use a micrometer and even an optical comparator.
Find the thickest and thinnest points of the tubing wall thickness, mark the cross-sections of thinnest and thickest wall with dotted lines, then measure the thickness at the lines with a micrometer. Last, compare the concentricity with the pre-determined quality control tolerance.
C = Wmin/Wmax * 100%
Wmin: the minimum width
Wmax: the maximum width
C is a percent, 100% means the tubing is fully concentric or wall thickness between the ID and OD are the same at the points around the diameter in each cross-section.
OD/ID Concentricity and Wall Runout
The OD/ID requirements can be indicated in several methods on your drawing: GD&T concentricity symbol, eccentricity percentage or Total Indicator Reading. Introducing OD/ID concentricity, another term we need to understand is the runout. Wall runout can not only measuring the concentricity but also the circularity of the part. It's derived from the eccentricity of a tube and describe the variation in wall thickness compared to a specific value. If you want to save time and cost of verifying concentricity, you can use the wall runout to replace concentricity, which is more achievable.
The calculating formula of the wall runout:
Wall runout = Eccentricity x 2
Eccentricity = (Maximum wall thickness – Minimum wall thickness) ÷ 2
